Mahi Mahi with Goat Cheese and Tomatoes

Image

Although I have chosen to use Mahi Mahi for this post, I have also used this method with both tilapia and halibut with great results.  The combination of creamy, tart goat cheese is wonderful with the sweet juicy tomatoes.  Super fast..super delicious..super healthy.

Image

Image

Mahi Mahi with Goat Cheese and Tomatoes

Adapted Gourmet June 2009

Ingredients

4 (6 Ounce) Mahi Mahi Fillets

2 Cups Cherry Tomatoes, halved

2 1/2 Tablespoons Olive Oil

1 Tablespoon Red Wine Vinegar

1/2 Teaspoon Salt

1/4 Cup Greek Yogurt

1/4 Cup Mayonnaise

3 Ounces Goat Cheese, crumbled

3 Tablespoons Chopped Fresh Mint

1 Teaspoon Dried Dill

1 Tablespoon Fresh Lemon Juice

Salt

Black Pepper

Directions

Preheat broiler, line a baking sheet with foil and brush 1/2 tablespoon of olive oil over the foil.  In a small bowl mix together tomatoes, 1 tablespoon olive oil, vinegar and 1/2 teaspoon salt.  Set aside.

In a medium bowl whisk together yogurt, mayonnaise, goat cheese, mint, dill and lemon juice.  Lay fish skin side down on the prepared baking sheet.  Season the top with salt and pepper and spread the yogurt/goat cheese mixture evenly among the top of fillets.  Drizzle the remaining 1 tablespoon olive oil over the top of the fish.  Broil the fish about 8 inches below heat until fish is cooked through, about 15 minutes.  Serve with tomatoes.  Serves 4.

Autumn Salad

Image

This is just simply a wonderful salad.  It’s easy to prepare, packed with nutrition and the taste is outstanding.  My perfect salad contains sweet, savory, salty and many textures, to boot, and this one has it all.  The savory chicken, the sweet squash, pears and vinaigrette, the salty bacon, the creamy goat cheese and the crunch of the walnuts will leave your tastebuds (and dining buddies) very VERY happy.  A perfect way to  celebrate Autumn.  

Image

Autumn Salad

Ingredients

For the Vinaigrette:

5 Tablespoons Olive Oil

3 Tablespoons Balsamic Vinegar

2 Tablespoons Pure Maple Syrup 

1 Tablespoon Dijon Mustard

1/2 Teaspoon Salt

1/8 Teaspoon Black Pepper

For the Salad:

2 Tablespoons Olive Oil

3 Cups Cubed Butternut squash (1/2 inch-1 inch cubes)

1 Teaspoon Salt

1/4 Teaspoon Black Pepper

6-8 Ounces Mixed Greens

4 Skinless Boneless Split Chicken Breasts, grilled or roasted

4 Slices Nitrate and Nitrite Free Bacon, cooked and chopped  *optional

1 Pear, diced

4 Ounces Goat Cheese, crumbled

1/2 Cup Chopped Walnuts

Directions

For the Vinaigrette:  Whisk all ingredients in a small bowl until well combined.  Set aside.

For the Salad:  Preheat oven to 425 and line a baking sheet with non stick foil.  Place squash on the baking sheet, drizzle with olive oil, sprinkle with salt and pepper and toss well to ensure all the squash is coated.  Spread out evenly in one layer and roast in the oven for 20 minutes or until squash is tender and just beginning to get a crust on it, stirring 1 time in the middle of cooking. Remove from oven and set aside to cool for 5-10 minutes.  

Begin to build your salads.  Drizzle all but 3 tablespoons of the vinaigrette on top of the greens and toss well to coat.  Divide the greens among four plates, top with squash, chicken, bacon, pear, goat cheese and walnuts.  Drizzle the remaining vinaigrette on top of the salads.  Serves 4.  

Parmesan Mashed Cauliflower

Image

If you are a mashed potato fan this recipe will be right up your alley.  I learned of this method from Rachel Ray about 10 years ago and I continue to make it over and over.  It’s so simple and easy to switch up and you’re guaranteed an awesome, healthful, extremely quick side dish that your entire family will devour.

Image

Parmesan Mashed Cauliflower

Ingredients

1 Large Head Cauliflower, broken into florets

3/4  Cup Chicken Stock

1/4-1/2 Cup Milk, preferably whole

1 Cup Freshly Shredded Parmesan

Salt and Pepper To Taste

Chives or Green Onion, optional

Directions

In a large pot bring cauliflower and chicken stock to a boil.  Cover, reduce heat and simmer for 12-14 minutes or until cauliflower is very tender.  Remove the lid, add milk (starting with 1/4 cup) and cheese and mash with a potato masher.  If you would like a thinner consistency add more milk, season with salt and pepper and top with chives or green onion.  Serves 4.

White Chicken Chili

Image

I can already tell this is going to be a chili kind of weekend.  The air is crisp, the ground is damp and the leaves are falling waaay to quickly.  This one pot meal is a family and friends favorite around here…I get asked for the recipe over and over.  It’s hearty and absolutely delicious…and it couldn’t be more quick and simple to prepare.  We love it served with homemade baked corn tortilla strips (just like in this recipe)  and a little green onion on top.  Perfect cozy-food.

White Chicken Chili

Notes:  This chili is just as good the next day so feel free to make it ahead of time.

Ingredients

2 Tablespoons Olive Oil

1 Large White Onion, diced

6 Cloves Garlic, finely chopped

1/2 Teaspoon Cayenne Pepper

1/2 Teaspoon Black Pepper

1 Teaspoon Salt

1 Teaspoon Chili Powder

2 Teaspoons Ground Cumin

1 Tablespoon Oregano Leaves

15 Ounce Can Fire Roasted Diced Tomatoes

2-4 Ounce Can Fire Roasted Diced Green Chilies

2-15 Ounce Cans Pinto or Great Northern Beans (I prefer to use one of each)

5 Cups Chicken Stock

3 Cups Shredded Cooked Chicken (rotisserie works great here)

1 Cup Sour Cream

1 Cup Shredded Monterey Jack Cheese

Directions

Heat olive oil over medium high heat in a large pot or dutch oven.  Add onion and cook, stirring frequently, until softened, about 10 minutes.  Add garlic, cayenne, black pepper, salt, chili powder, cumin and oregano and cook, stirring constantly, 1 minute.  Stir in tomatoes, chilies and chicken stock and bring to a boil.  Once at a boil turn the heat down and simmer for 10 minutes, stirring occasionally.  Add the chicken and beans and simmer 10 additional minutes.  Add sour cream and cheese and stir until well combined and melted.  Season with additional salt and pepper as desired and serve.  Serves 6-8.

Perfect Applesauce

Image

We finally made our much anticipated trip to the apple orchard this past weekend and, needless to say, it was all we thought it would be.  The weather was absolutely perfect.  The company?  Well, aside from the fact that they probably ate more apples than they actually picked I couldn’t ask for better.  And the apples?  Ooooohhhhh the apples.  If there was such a thing as an apple coma all three of us would be knocked out by now.  We just cant get enough.

Image

Image

Image

Image

Nothing screams fall to me like applesauce.  I have been making this delicious recipe for applesauce for quite some time but once I began making baby food for Georgia I was in search of a much more healthful but just as delicious way to prepare it.  I stumbled across this recipe and with a few changes it has become our households new favorite.  Aside from being extremely healthful the taste reflects out of this world apple goodness…you simply can not find this flavor at a grocery store.  It’s sweet and tart, has the perfect hint of cinnamon and will make your entire house smell divine.  Quite honestly I’m convinced that this is what truly made Georgia fall in love with me.  Make this one time and I assure you that you will look as forward to apple season as much as we do each year.

Image

Image

Notes:  The sauce can be as sweet or as tart as you’d like, depending on the type of apples you use.  I prefer to use a sweet, slightly tart apple such as Honeycrisp (I have a slight obsession) or Pink Lady paired with something fresh and sweet like Fuji or McIntosh…they make great duos in my eyes.

I would always freeze this sauce in ice cube trays for Georgia.  I’d pour the applesauce into the trays and freeze until solid.  Then pop them out, place in a freezer storage bag and return to the freezer.  Pull one or two out for the perfect tiny mouth portion or a handful for a mama-sized portion 😉  Thaw in the refrigerator.

Perfect Applesauce

Ingredients

3.5-4 Pounds Apples, peeled, cored and quartered

Juice From One Orange, about 1/8-1/4 cup

3 Strips Lemon Peel

1 1/2 Teaspoons Ground Cinnamon

1 Cup Water

Directions

Place all ingredients in a large pot and bring to a boil.  Once boiling give it a good stir, cover, reduce heat and simmer for 35-40 minutes or until apples are completely softened.  Stir the apples one time in the middle of cooking.  Remove from heat and allow sauce to cool for 20-30 minutes, remove lemon peel and puree in a food processor until smooth.  Can be stored in an air tight container in the refrigerator for up to two weeks or in the freezer for up to six months.  Makes 1 1/2 quarts.

Pumpkin Pie Cookies with White Chocolate Chips

Image

Well guys, I thought I should let you know that I have named a new holiday today.  Ah, yes, I’m feeling so brilliant and on top of things.  Lets call it “national cookie day when it’s not supposed to be national cookie day, day”.  You like?  Has a nice ring to it, eh?

Today was a rushed one thus far.  A lot on the to-do list but at the top of my list was to make cookies so I could share the recipe with all of you.  Want to know why?  Well, yeah, because I love you.  But also because my calendar said it was “national cookie day”…a day I have been mentally preparing for for some time.  Contemplating, “do I go all out and give them a splurged out, over the top indulgent recipe”  or “stay consistent and try to keep it somewhat healthful” or “do I make a cookie bar, or just plain old cookies”.  Sleep was practically lost, people.  My husband even called me today to say “dont forget its national cookie day” (clearly he saw that on our “shared” calendar and although I like to think he was just looking out for me…part of me thinks he may have been reminding me so that he could reap the benefits).  So anyway, I got in the kitchen and made these cookies..rushing to have them to you in time to celebrate this monumental day.  And now, as I sit down to tell you about them I realize all of my hopes and dreams and plans are lies lies lies.  I googled “national cookie day” to be sure I was giving you the correct information and guess what?  It’s totally not national cookie day at all.  National cookie day happens to fall on December 4.  I swear to you I read somewhere that today was the day and that is why I put it on my calendar and now I am feeling utter betrayal.  So this is how “national cookie day when its not supposed to be national cookie day, day” began.

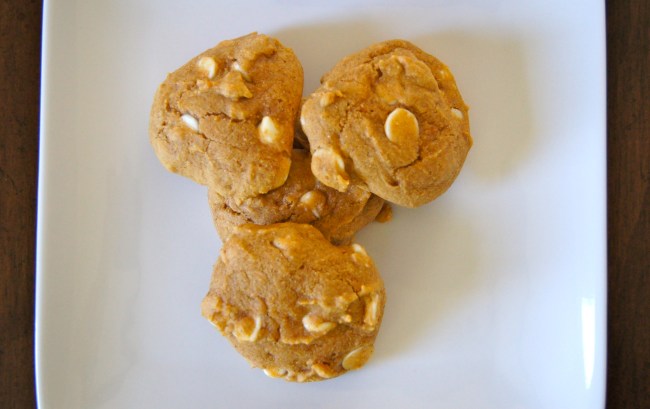
So now I must tell you about these cookies.  They are pumpkin pie in cookie form, no doubt.  They are slightly more cake-like then I typically prefer in a cookie because I am partial to crunchy on the outside, chewy and firm on the inside cookies but clearly I must not think they are too bad.  I’ve eaten five.  The taste is top notch.  I adapted them from this recipe and while I swapped out an all purpose gluten free flour, added oats and lowered the sugar there are just a few minor changes.  The results are wonderful and I will definitely be making them again.

On a side note, as I write this my timer just went off to go get my last tray of these cookies out of the oven.  I just went to grab them, opened the oven and guess what?  There were no cookies in there.  I forgot to put them in.  Wow, thinking I may just need to count my losses for the day now 😉

*** Update 10.2.2013 ***  These cookies become extremely soft and cake-like after being stored in an air tight container overnight.  I will only be making these again if I serve them the same day as I was not impressed with how they stored.

Pumpkin Pie Cookies with White Chocolate Chips

Ingredients

2 1/4 Cups All Purpose Flour (I used Bobs Red Mill All Purpose Gluten Free Baking Flour)

1/2 Cup Old Fashioned Oats

1 Teaspoon Baking Powder

1 Teaspoon Baking Soda

3/4 Teaspoon Pumpkin Pie Spice

3/4 Teaspoon Ground Cinnamon

1/2 Teaspoon Salt

1/2 Cup Butter, softened

1/2 Cup Granulated Sugar

1/2 Cup Light Brown Sugar

1 Teaspoon Pure Vanilla Extract

1 Cup Canned Pumpkin

1 Egg

1 1/4 Cups White Chocolate Chips

Directions

Preheat oven to 350 and whisk together flour, oats, baking powder, baking soda, pumpkin pie spice, cinnamon and salt.  With a hand held or electric mixer cream butter and both sugars until combined.  Add vanilla, pumpkin and egg and beat until incorporated.  Add in dry ingredients and mix until combined.  Stir in white chocolate chips.  Drop by tablespoons onto cookie sheets and bake for 11 minutes.  Makes 36 cookies.

Summer Vegetable Quinoa “Risotto”

Image

It was so tough for me to capture a photo that would do this recipe justice.  I can very honestly say that this was one of the best dishes I prepared all summer; and so simple too.  What a great way to end the season and I’m currently wondering how I can have it just one more time before that beautiful produce is no longer available.  The flavor is over the moon good…fresh, sweet, savory, light, cheesy and gooey all in one perfect bite.  Full of protein, fiber, vitamins and calcium it’s just the perfect meal in itself.  I’m confident your family will love this as much as we did.

Image

Image

Summer Vegetable Quinoa “Risotto”

Ingredients

1 1/4 Cups Uncooked Quinoa

2 1/2 Cups Chicken Stock

2 Tablespoons Olive Oil

1 Ear Of Corn, kernels cut off (about 1 cup of kernels)

4 Garlic Cloves, chopped

1 Medium Zucchini, grated or diced small

1 Large Tomato, diced

2/3 Cup Half and Half

3/4 Cup Shredded Parmesan

3/4 Teaspoon Salt

1/2 Teaspoon Pepper

1/4 Cup Chopped Fresh Basil

Directions

In a saucepan bring quinoa and chicken stock to a boil over high heat.  Once boiling, reduce heat, cover, and simmer for 12 minutes or until liquid is absorbed and quinoa is cooked and fluffy.

Heat olive oil in a large skillet or dutch oven over medium heat.  Add corn and sauté for 2 minutes.  Add garlic and sauté 1 additional minute.  Add zucchini, tomatoes and their juices and cook, stirring occasionally, for five minutes or until vegetables are just beginning to soften.  Stir in quinoa, half and half, parmesan, salt and pepper and simmer over low heat until liquid is absorbed and cheese is melted, about five minutes.  Stir in basil and serve.  Serves 4

Slow-Baked Salmon with Dijon

Image

The health benefits of salmon make up a hearty list.  Just to name a few, salmon aids in reducing inflammation, brain health, cancer prevention, heart health and the overall health and appearance of our skin and hair.  My favorite method for cooking salmon was adapted from this recipe and it allows for so many variations with regard to flavors and tastes.  In this recipe I am sharing with you, I have paired it with dijon mustard which is the perfect compliment to the rich fish.  The cooking method makes for the most tender, succulent fish I have ever prepared…and it is about as simple and effortless as it gets.  This recipe is a perfect weeknight meal because it is so quick and simple to prepare but is special enough for company because of its elegance.

Image

Slow-Baked Salmon with Dijon

Ingredients

1 1/4 Pounds Boneless Salmon Filets, skin on

1 1/2 Tablespoons Olive Oil

2 Teaspoons Dijon Mustard

1 Tablespoon Fresh Chopped Parsley

Salt and Ground Black Pepper

Directions

Heat the oven to 275 and line a baking sheet with foil.  Brush the foil with 1/2 tablespoon olive oil.  In a separate boil whisk together the remaining 1 tablespoon olive oil, dijon mustard and parsley.  Lay salmon filet(s) skin side down on the prepared baking sheet, spread the olive oil/dijon mixture over the top and season liberally with salt and ground black pepper.  Place in the preheated oven and bake for 18 minutes or until the fish is just opaque in the center.  Turn the oven to broil and cook for an additional 2 minutes or until top just begins to turn golden.  Serves 3-4

Ranch Seasoning Mix

Image

We are the ranch generation. We dip with it and dress with it…not literally, like dress salads and such.  Geez, get your mind out of the gutter!  I am as guilty as the next gal for seriously loving the taste of those store bought packets of ranch seasoning that you add to ingredients to make dips, dressings, sauces, lots of goods.  Once in a while  I just want a salad with creamy buttermilk ranch dressing or some ranch to put on my wrap or sandwich.  After trying a zillion shots at duplicating the store bought kind I’ve finally got one that is truly a winner.  It tastes amazing, is a fraction of the cost and you have complete control over what goes into it; none of those scary words that you cant pronounce on this ingredient list.  Another perk?  Offer ranch dressing as a dip for those certain foods your husbands kids refuse to eat and they will no longer refuse…tricky tricky, eh?  I make a big batch in about 2 minutes and keep it on hand stored in an air tight container…it’s shelf life would last you months but theres no way your bellies will allow it to stay there that long.  Two minutes well spent, my friends.

Ranch Seasoning Mix

Ingredients

3 Tablespoons Dried Parsley

1 1/2 Tablespoons Onion Powder

1 Tablespoon Garlic Powder

1 Tablespoon Dried Dillweed

2 Teaspoons Salt

2 Teaspoons Pepper

1 Teaspoon Dried Chives

Pinch of Cayenne Pepper, optional

Directions

Mix all ingredients together and store in an air tight container for up to 6 months.  Makes about 1/2 cup seasoning.

Notes:  although you can use this seasoning mix for a million different things, buttermilk ranch dressing is a common use in this house

Just whisk together

2 tablespoons of the seasoning

1 Cup either mayo/sour cream/greek yogurt (or any combination of the three)

1/3-1/2 cup buttermilk, depending on how thin you like it

1 Tablespoon White Vinegar, optional

Sausage, Bean and Vegetable Soup

Image

Well…it’s beginning to feel a lot like my favorite time of year.  Football has begun, the air has cooled down (at least for now) and soups and stews are preparing to overtake my kitchen, ahhhh the excitement is out of control over here!  This is a favorite of ours that is just perfect for this time of year because we can still utilize the fresh kale, carrots and potatoes from our local farmer.  The flavors of the soup are rich and warm without making the consistency too dense or heavy.  Real ingredients prepared quickly with crazy amounts of savory flavor…my kind of one pot meal.

Image

Sausage, Bean and Vegetable Soup

Ingredients

2 Tablespoons Olive Oil

1 Pound Ground Italian Sausage

1 Large Onion, diced

3 Large Carrots, diced

6 Cloves Garlic, chopped

2 Bay Leaves

3/4 Pound Red Potatoes, diced into 1 inch cubes

1 15 Ounce Can Great Northern Beans, drained and rinsed

4 Cups Chicken Stock

1 Teaspoon Salt

1/2 Teaspoon Pepper

3/4 Cup Half and Half

3 Cups Chopped Kale

1 Cup Fresh Shredded Parmesan

Directions

In a large pot or dutch oven heat 1 tablespoon olive oil over medium high heat.  Add sausage and cook until browned, breaking it up with the back of your spoon.  Remove sausage from the pain and drain grease.  Add the other tablespoon of oil to the pan along with onions and carrots.  Sauté for 5 minutes or until vegetables just begin to soften.  Add garlic and bay leaves and sauté for 1 additional minute.  Add potatoes, beans, stock, salt and pepper, bring to a boil and simmer, covered, for 20 minutes or until potatoes are just cooked thru.  Stir in the cooked sausage, half and half, kale and parmesan and let simmer for an additional 5 minutes.  Serves 4-6